emqx/ek-can
EK-CAN is a lightweight CAN bus data analytics software based on [eKuiper](https://ekuiper.org/).
3.7K
emqx/ek-can repository overview
EK-CAN - An edge lightweight CAN bus data analytics software based on eKuiper




Overview
EK-CAN is an edge lightweight CAN bus data analytics software based on eKuiper.
LF Edge eKuiper is a lightweight IoT data analytics and stream processing engine running on resource-constraint edge devices. The major goal for eKuiper is to provide a streaming software framework (similar to Apache Flink) in edge side. eKuiper's rule engine allows user to provide either SQL based or graph based (similar to Node-RED) rules to create IoT edge analytics applications within few minutes.
Based on eKuiper, EK-CAN provides a series of CAN bus related features. It can be used to collect, filter, transform, aggregate and analyze CAN bus data in real time. Generally, it provides these additional features:
cansource: read CAN bus data from socketCAN interface- can related format:
canformat: parse CAN frame into physical key-value pairs to be processed by eKuiper. Use can specify the DBC file to parse the CAN frame.canjsonformat: Parse batch CAN frames in a JSON string into physical key-value pairs to be processed by eKuiper. Use can specify the DBC file to parse the CAN frame.
How to use this image
Notice that, socketCAN is only supported on Linux. To use socketCAN, this image can only run on Linux with socketCAN enabled.
If you want to use can interface in the host machine, you need to use --network host to use the host network.
docker run -d --name ekuiper --network host -e CAN__DEFAULT__ADDRESS="can0" -e MQTT_SOURCE__DEFAULT__SERVER="tcp://127.0.0.1:9081" emqx/ek-can:$tag
If you don't need the host network, just export 9081 port to the host machine.
docker run -p 9081:9081 -d --name ekuiper -e CAN__DEFAULT__ADDRESS="can0" -e MQTT_SOURCE__DEFAULT__SERVER="$MQTT_BROKER_ADDRESS" emqx/ek-can:$tag
You can override the CAN configurations by environment variables. In this example, we set the default CAN address
to can0 by environment variable CAN__DEFAULT__ADDRESS. Check
the eKuiper configuration doc
for the details about how environment variable map to the configurations.
Run with eKuiper manager UI
Notice: eKuiper manager UI does not support to set the can and canjson format in version 1.9.2 and before. You can
use the REST API to create the stream.
If you want to use the eKuiper manager UI, you can refer to the docker compose file below:
version: '3.4'

services:
  ekuiper:
    image: emqx/ek-can:latest
    container_name: ekuiper_can
    ## The hostname of the container. Use this hostname to connect to the eKuiper service in the docker network.
    hostname: ekuiper
    ## Use host network to connect to the host CAN interface if needed
    network_mode: host
    ## Uncomment the port mapping if not using host network
    #    ports:
    #      - "9081:9081"
    restart: unless-stopped
    volumes:
      - kuiper_data:/kuiper/data
      ### Specify your dbc file location
      # - /opt/dbc:/kuiper/dbc
    environment:
      ## Set default MQTT broker address
      MQTT_SOURCE__DEFAULT__SERVER: "tcp://127.0.0.1:1883"
      ## Set default CAN address
      CAN__DEFAULT__ADDRESS: "can0"
      ## Override log configurations
      KUIPER__BASIC__CONSOLELOG: "true"
      KUIPER__BASIC__DEBUG: "false"
      KUIPER__BASIC__IGNORECASE: "false"
  manager:
    image: emqx/ekuiper-manager:1.9.3
    container_name: manager_can
    ports:
      - "9082:9082"
    restart: unless-stopped
    environment:
      ## Setting default eKuiper service address.
      ## For host mode, use the host ip address of host name
      DEFAULT_EKUIPER_ENDPOINT: "http://192.168.100.1:9081"
      ## For non-host mode, Use the host name of the eKuiper container specified in this docker compose file.
      # DEFAULT_EKUIPER_ENDPOINT: "http://ekuiper:9081"
volumes:
  kuiper_data:
This is a docker compose file to use host network to access host socketCAN interface. Change DEFAULT_EKUIPER_ENDPOINT
to your own eKuiper service address and run with docker compose up -d. Then you can access the eKuiper manager UI
at http://localhost:9082.
If you don't need host network, just read the comments in the docker compose file and modify to make it work.
Contact Us
If you need more information or support, please contact us.
Quick Start
It can be used to process the CAN bus data directly by socketCan or to process the CAN bus data from other protocols, such as MQTT.
Prerequisites
DBC file defines the CAN bus signals. We use the DBC file to decode the CAN bus data into readable signals.
So, before running the demo, you need to prepare the DBC file. We already prepare sample dbc files in the dbc folder.
You can replace them with your own dbc files.
Connect to socket can
SocketCAN is a networking protocol implementation in the Linux kernel that provides a socket-based interface for communicating with Controller Area Network (CAN) devices. It is part of the linux kernel.
Setup CAN interface in the host machine
If you connect to the CAN bus with real hardware, you'll have a native CAN interfaces.
Use ip link show command to list all the interfaces, and the interface of type link/can is the CAN interface.
If you have a physical CAN interface, you should see the interface in the list. Remember its name, which will be used in
the next step.
If you don't have a real CAN interface, you can use the virtual CAN interface.
Take ubuntu as an example, we can enable a virtual CAN interface and create a vcan interface named can0 by the
following commands:
sudo modprobe vcan
sudo ip link add dev can0 type vcan
sudo ip link set up can0
Check the interface by ip link show command, you will see the interface can0 is created.
Send/Receive CAN data
We will install can-utils to send/receive CAN data.
sudo apt install can-utils
Then we can receive and print the raw CAN data by the following commands:
candump can0
In another terminal, we can send CAN data for testing:
cansend can0 123#1122334455667788
In which, the 123 is the CAN ID, and 1122334455667788 is the data payload.
Make sure the data is printed out in the first terminal.
Until now, our CAN interface is ready.
In the next section, we will use cansend to send test data to eKuiper.
Create canDemo Stream
eKuiper provides CLI, REST API and eKuiper manager UI to manage the rules. We will do these steps in manager UI and REST API respectively to create the same rules. To use REST API, we recommend to use Postman or any http client tools to send the HTTP requests. In this doc, we will specify the HTTP method, URL and request body for each step.
Firstly, we need to create a stream to connect to the virtual can interface can0. The stream definition is as below:
create
stream canDemo () WITH (TYPE="can", CONF_KEY="default", FORMAT="can", SHARED="true", SCHEMAID="dbc")
TYPE="can": The stream type iscan, which will connect to the CAN bus by socketCan.CONF_KEY="default": The configuration key isdefault, which will use the default configuration in the configuration file. The default configuration is inetc/sources/can.yamlwhich defines the can address tocan0. You can override with your own configuration atdata/sources/can.yaml.FORMAT="can": The format of the data iscan, which will parse the raw CAN data for each can frame into a map of signals with dbc.SHARED="true": The stream is shared, which means the stream will be shared by all the rules.SCHEMAID="dbc": The schema of the stream isdbc, which will use the dbc files inside thedbcfolder to parse the raw CAN data.
eKuiper manager support to set the can and canjson format after version 1.9.3. In previous version, you can use the
REST API to create
the stream. Create by REST API:
POST http://{{ekuiper_host}}/streams
Content-Type: application/json

{
  "sql": "create stream canDemo () WITH (TYPE=\"can\", CONF_KEY=\"default\", FORMAT=\"CAN\", SHARED=\"TRUE\", SCHEMAID=\"dbc\")"
}
The format here means:
POST: The HTTP method isPOST.http://{{ekuiper_host}}/streams: The endpoint url, replace the{{ekuiper_host}}with your eKuiper service ip address or hostname.Content-Type: application/json: Add a header to specify the request body is a json string.{"sql":...}: The request body json string.
You can use Postman or other HTTP client tools to send the request.
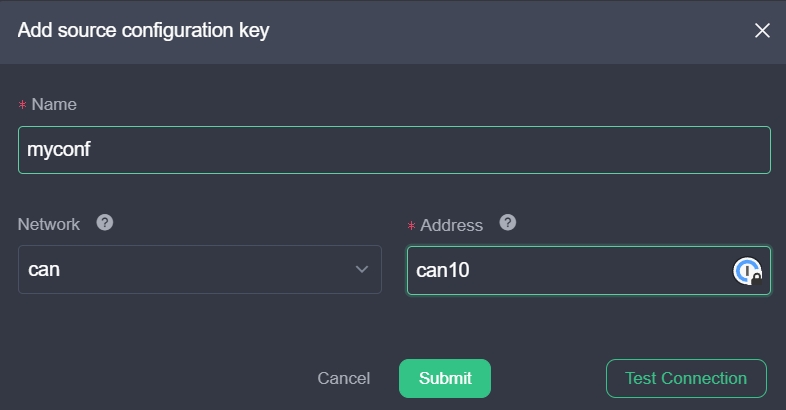
Go to the manager UI, you'll find the stream canDemo is created. Click the Edit button to check the stream
definition. You can update the CAN address by click Add configuration key button and in the popup window, fill in your
configurations. Click OK button to save the configurations. In below example, we change the CAN address to can10 and
save to a new confkey myconf.
Create the First Rule
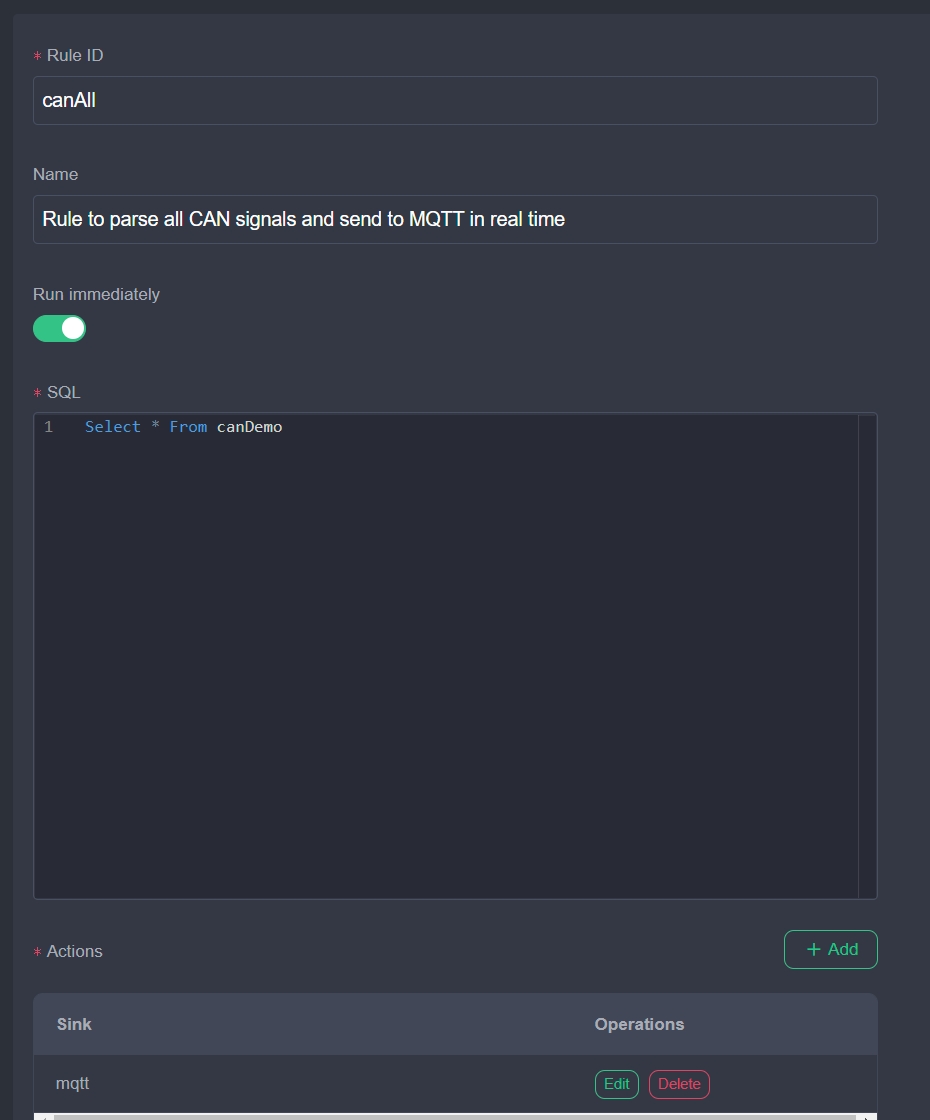
Then we can create a rule to collect all the data. We create the simplest rule named canAll to select all the data
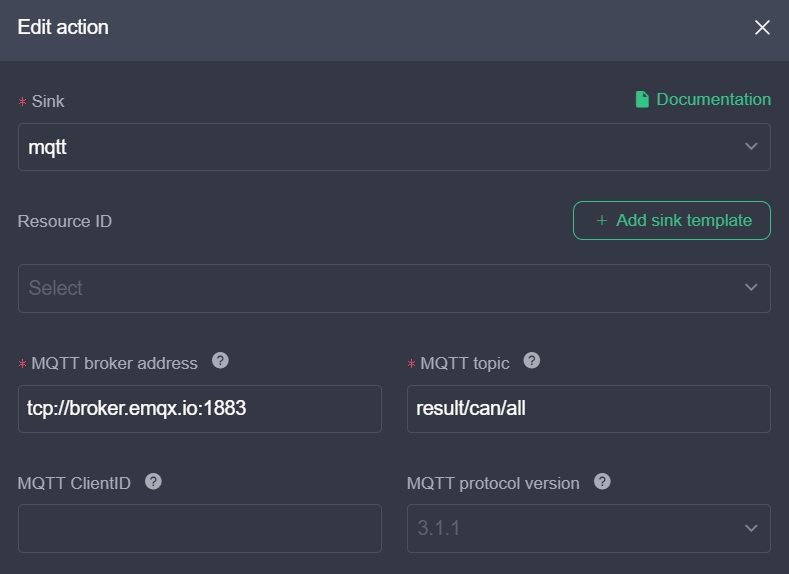
from the stream canDemo and send to MQTT topic result/can/all in public EMQX broker tcp://broker.emqx.io:1883. You
can use your own EMQX broker instead by changing the server property in the MQTT action.
- Create by manager UI: Go to
Rulestab, ClickCreate Rulebutton. Fill in the rule idcanAll, rule name ( description)Rule to parse all CAN signals and send to MQTT in real time, enable Run immediately, rule sqlSelect * From canDemo. In Actions section, clickAddbutton, selectmqttaction, fill in the servertcp://broker.emqx.io:1883, topicresult/can/all. ClickOKbutton to create the rule.
Rule definition:
Action definition:
- Create by REST API:
POST http://127.0.0.1:9081/rules
Content-Type: application/json

{
  "id": "canAll",
  "sql": "Select * From canDemo",
  "actions": [
    {
      "mqtt": {
        "server": "tcp://broker.emqx.io:1883",
        "topic": "result/can/all",
        "sendSingle": true
      }
    }
  ]
}
Test the rule
Use MQTT client MQTTX, connect to tcp://broker.emqx.io:1883 or the broker address which is
specified in the rule action, subscribe to the result/can/all topic, and prepare to view the output results of the
rule.
Go to the host and send test data to the can interface can0 by cansend command:
cansend can0 586#5465737400000000
Make sure the data can fit your DBC file. The ID must be presented in the DBC file, and the data payload must be the same length as defined in the DBC file.
Notice that, if the ID is not presented in the DBC file, the data will be ignored.
Then check the output in MQTTX, you should receive messages like:
{
  "VBBrkCntlAccelPedal": 0,
  "VBTOSLatPstn": 87.125,
  "VBTOSLonPstn": 168.75,
  "VBTOSObjID": 0,
  "VBTOSTTC": 46.4
}
Connect by Other Protocols with CANJSON format
Due to security or privacy reasons, we may not want to connect to the CAN bus directly. Typically, user will have a gateway to receive the CAN data and send it to applications by other protocols such as TCP, UDP or MQTT. And the gateway will packet multiple CAN frames into one message.
In this section, we'll use MQTT as an example to show how to process the CAN data from other protocols. The serialization format may be private. And we'll use the CANJSON format which packet multiple CAN frames into a JSON to send the CAN data.
Create Rules to process CAN data
Refer to the previous section about how to create the stream and rule by manager UI and REST API. In this section, we will just highlight the stream/rule content.
Firstly, we need to create a stream to connect to MQTT to receive the data. The stream definition is as below:
create
stream mqttCanDemo () WITH (TYPE="mqtt", CONF_KEY="default", FORMAT="canjson", SHARED="true", SCHEMAID="dbc", DATASOURCE="canDemo")
TYPE="mqtt": The stream type ismqtt, which will connect to a MQTT broker and subscribe to a topic.DATASOURCE="canDemo": The topic to subscribe iscanDemo. You can change it to your own topic.CONF_KEY="default": The configuration key isdefaultwhich defines the socketCan connection properties inetc/mqtt_source.yaml.FORMAT="canjson": The format of the data iscanjson, which will parse the json of multiple can frames into a map of signals with dbc.SHARED="true": The stream is shared, which means the stream will be shared by all the rules.SCHEMAID="dbc": The schema of the stream isdbc, which will use the dbc files inside thedbcfolder to parse the raw CAN data.
Then we can create a rule to print the data:
{
  "id": "canAll2",
  "sql": "Select * From mqttCanDemo",
  "actions": [
    {
      "log": {}
    }
  ]
}
We create the simplest rule named canAll2 to select all the data from the stream mqttCanDemo and print it out.
It will show that the raw data are parsed into a map of signals.
Test the rule
Send test data to the MQTT topic canDemo.
The frames can contain any number of CAN frames.
Make sure each can frame id are defined in the DBC file.
{
  "frames": [
    {
      "id": 1006,
      "data": "54657374000000005465737400000000"
    },
    {
      "id": 1414,
      "data": "5465737400000000"
    }
  ]
}
We will get output similar to:
{
  "VBBrkCntlAccelPedal": 0,
  "VBTOSLatPstn": 87.125,
  "VBTOSLonPstn": 168.75,
  "VBTOSObjID": 0,
  "VBTOSTTC": 46.4
}
Further processing
Now that we have the CAN data in the map format, we can leverage eKuiper capabilities for further processing on the data just like JSON data that we receive from MQTT or other protocols. Check the eKuiper doc for more scenarios you can do.
Further Reading
- Bridging Demanded Signals From CAN Bus to MQTT by eKuiper
- Data Stream Processing for Software-Defined Vehicle
- What Is Can Bus and How It Works?
Useful Links
License Terms
EMQ License Terms
EK CAN edition, EVALUATION
These license terms are an agreement (the "Agreement") between you (as an individual if you are an individual user or the entity on whose behalf these terms are accepted) and EMQ Technology Incorporated, a Delaware corporation(or one of its affiliates) ("EMQ"). They apply to the software named above (the "Software") and any EMQ services or software updates (except to the extent such services or updates are accompanied by new or additional terms, in which case those different terms apply prospectively and do not alter your or EMQ’s rights relating to pre-updated Software or services.) BY ACCEPTING THIS AGREEMENT OR USING THE SOFTWARE, YOU ACCEPT THESE TERMS. IF YOU DO NOT ACCEPT THEM, DO NOT USE THE SOFTWARE. If you accept these terms on behalf an entity, you represent and warrant you have the authority and power to enter this agreement and to bind the party to the terms and conditions of this Agreement.
- INSTALLATION AND USE RIGHTS. You may install and use any number of copies of the Software on your devices. This is an evaluation license and you may use the Software only for internal evaluation purposes but not for any commercial or production use.
- SCOPE OF LICENSE. The Software is licensed, not sold. EMQ reserves all other rights and you shall not, including without limitation:
- circumvent any technical limitations in the Software;
- reverse engineer, decompile or disassemble the Software;
- remove, minimize, block, or modify any notices of EMQ or its suppliers in the Software;
- use the software in any way that is against the law or to create or propagate malware;
- distribute the Software;
- make more copies of the Software than allowed by applicable law, despite this limitation;
- publish the Software, including any application programming interfaces included in the software, for others to copy;
- share, distribute, or lend the software, provide the Software as a hosted solution for others to use, or transfer the Software or this agreement to any third party;
- DOCUMENTATION. Any person that has valid access to your computer or internal network within your organization may copy and use any documentation provided by EMQ for your internal reference purposes relating to the Software evaluation.
- EXPORT RESTRICTIONS. You must comply with all applicable domestic and international export laws and regulations that apply to the software, which include restrictions on destinations, end users, and end use.
- SUPPORT SERVICES. EMQ is not obligated under this Agreement to provide any support services for the Software. ANY SUPPORT PROVIDED IS “AS IS”, “WITH ALL FAULTS”, AND WITHOUT WARRANTY OF ANY KIND.
- ENTIRE AGREEMENT. This Agreement set forth the entire agreement of the parties and supersedes all prior or contemporaneous writings, negotiation, and discussion with respect the subject matter thereof.
- GOVERNING LAW AND JURISDICTION. This Agreement is governed by and construed in accordance with the internal laws of the State of California without giving effect to any choice or conflict of law provision or rule that would require or permit the application of the laws of any jurisdiction other than those of the State of California. Except as otherwise set forth herein, any legal suit, action, or proceeding arising out of or related to this Agreement or the rights granted hereunder will be instituted in the federal courts of the United States or the courts of the State of California in each case located in the city of San Francisco and County of San Francisco, or in the city of San Jose and County of Santa Clara, and each party irrevocably submits to the jurisdiction of such courts in any such suit, action, or proceeding.
- CONSUMER RIGHTS; REGIONAL VARIATIONS. This Agreement describes certain legal rights. You may have other rights, including consumer rights, under the laws of your state or country. Separate and apart from your relationship with EMQ, you may also have rights with respect to the party from which you acquired the software. This Agreement does not change those other rights if the laws of your state or country do not permit it to do so. EMQ will only be liable for negligence if EMQ is in breach of such material contractual obligations, the fulfillment of which facilitate the due performance of this agreement, the breach of which would endanger the purpose of this agreement and the compliance with which a party may constantly trust in (so-called "cardinal obligations"). In other cases of slight negligence, EMQ will not be liable for slight negligence.
- DISCLAIMER OF WARRANTY. THE SOFTWARE IS LICENSED “AS IS.” YOU BEAR THE RISK OF USING IT. EMQ GIVES NO EXPRESS WARRANTIES, GUARANTEES, OR CONDITIONS. TO THE EXTENT PERMITTED UNDER APPLICABLE LAWS, EMQ EXCLUDES ALL IMPLIED WARRANTIES, INCLUDING MERCHANTABILITY, FITNESS FOR A PARTICULAR PURPOSE, AND NON-INFRINGEMENT.
- LIMITATION ON AND EXCLUSION OF DAMAGES. YOU CANNOT RECOVER ANY DAMAGES, INCLUDING CONSEQUENTIAL, LOST PROFITS, SPECIAL, INDIRECT, OR INCIDENTAL DAMAGES. This limitation applies to (a) anything related to the software, services, content (including code) on third party Internet sites, or third party applications; and (b) claims for breach of contract, warranty, guarantee, or condition; strict liability, negligence, or other tort; or any other claim; in each case to the extent permitted by applicable law. It also applies even if EMQ knew or should have known about the possibility of the damages. EMQ'S TOTAL AGGREGATE LIABILITY UNDER THIS AGREEMENT IS $500.
Tag summary
Content type
Image
Digest
sha256:b72e83b9b…
Size
18.9 MB
Last updated
over 2 years ago
docker pull emqx/ek-can